About
Basic concepts and guidelines
User Guides
For users
For mappers
Technical
Learn about Dokuwiki
About
Basic concepts and guidelines
User Guides
For users
For mappers
Technical
Learn about Dokuwiki
This is an old revision of the document!
 This page is outdated. Please help completing the wiki updates.
(remove this paragraph once the page is updated)
Vagrant is free and open-source software for creating and configuring virtual development environments. It can be seen as a wrapper around virtualization software such as VirtualBox, and around configuration management software such as Chef, Salt or Puppet.
Ansible is an open-source software platform for configuring and managing computers. It combines multi-node software deployment, ad hoc task execution, and configuration management. It manages nodes over SSH and requires Python (2.4 or later) to be installed on them. Modules work over JSON and standard output and can be written in any programming language. The system uses YAML to express reusable descriptions of systems.
ODM developers can choose Vagrant for managing Virtual Machines where testing and development tasks can be undertaken. For this, following software needs to be installed and configured:
odm-deployment repo on github contains, among other scripts, the necessary files to configure and provision a Vagrant box for development. For cloning it using the terminal, type:
git clone https://github.com/OpenDevelopmentMekong/odm-deployment.git
This command will download the code from the repository, it contains also other useful scripts that we will need afterwards. Following files interests us particularly:
In order to start the development box, change directory to where the Vagrantfile is and type:
cd odm-deployment
vagrant up
This will take some time because the virtual box will be provisioned with the instructions specified in the bootstrap.sh. This script basically install some needed dependencies such as git and ansible and runs the set of Ansible instructions available on deployment/ansible in order to provision the VM.
The provisioning process might take between 5 and 15 minutes, depending on the power of your machine and speed of your internet connection.
For more information about provisioning Vagrant, refer to Vagrant documentation
Aparently, the VM needs to be restarted once after the deployment is ready in order for the different services to start properly. Following command needs to be run:
vagrant reload
Sometimes, the deployment of the Development Environment will be stuck at some points that caused by wrong configuration or the speed of internet connection.
* Please check “ansible\group_vars\vagrant-box” to make sure that all requirement attributes below are provided:
* If they are correctly provided, then try to change the location of Ubuntu servers to different regions that is closer to your location.
The default is “copy: src=sources.list dest=/etc/apt/sources.list owner=root group=root mode=0644” updated to: “copy: src=sources.th.list dest=/etc/apt/sources.list owner=root group=root mode=0644”
Please go ahead to download the solr and tomcat below and place them in “odm-deployment\installables”.
Once the process is finished and no errors have occurred, it is time to access the machine via ssh. There are still some necessary steps to be done.
vagrant ssh
Exit the ssh session and call vagrant halt, this way the box will be stopped, you can start it any time by calling vagrant up again.
exit
vagrant halt
Replicating the system on a Webfaction instance uses the same Ansible scripts used for the Vagrant VM.
As specified above, the ansible/group_vars/webfaction-servers file must be edited with URLs and Ports defined on webfaction prior to starting the provisioning.
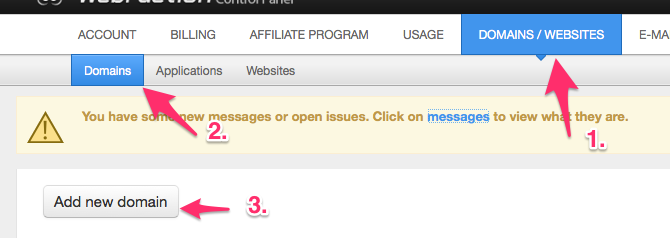
Add a new domain such as ckan.yourwebfactionusername.webfactional.com and press save. For the sake of the example, my webfaction user is opendevmk therefor it'll be ckan.opendevmk.webfactional.com
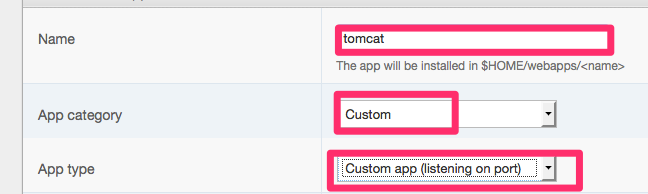
Now we need to add applications for Tomcat and Ckan, which basically reserves a port on the server and optionally exposes it on the firewall or a domain. Go to “Applications” then click “Add new application”
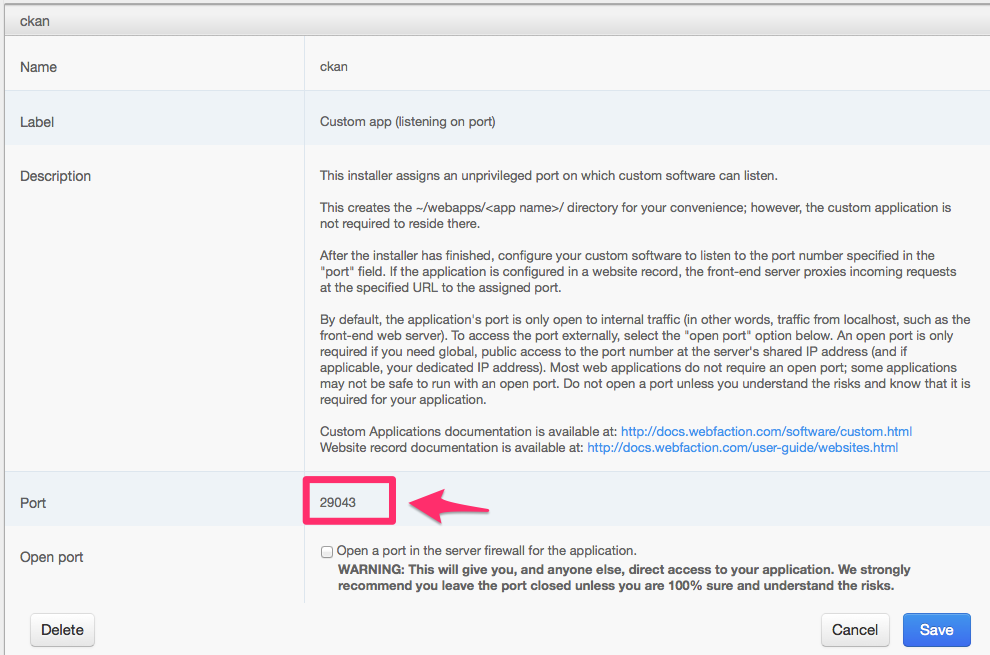
Repeat for app name ckan then when you click on the entry you've just added you'll see a port number. Note them down you'll need it later.
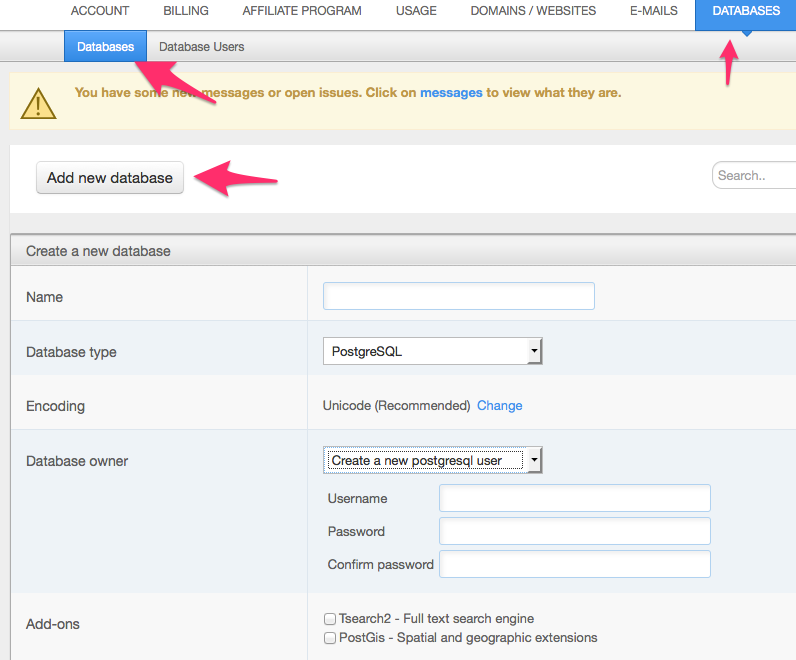
Lastly, click on dabase → databases –> add new database and add the postgresql database for ckan.
In order to start the provisioning, we need to run the ansible-playbook command:
cd ansible
ansible-playbook site.yml -i stage
The provisioning scripts installs CKAN and its dependencies plus some extensions, but there are still some actions to be taken in order to configure the development environment completely:
After activating the python environment with
. ~/.virtualenvs/ckan/bin/activate
, you can execute
paster --plugin=ckan sysadmin add USERNAME ~/etc/ckan/default/development.ini
OR
paster --plugin=ckan sysadmin add USERNAME -c ~/etc/ckan/default/development.ini
for creating a new user with sysadmin permissions, or attribute those permissions to an existing user. USERNAME is the account name, you can name whatever eg. admin or user1
Once this is done and password has been set, you can login into CKAN under http://192.168.33.10:8081/user/login.
Since the ckanext-odm_migration extension gets installed automatically while provisioning the vagrant machine. Once logged in, you can access http://192.168.33.10:8081/migration where you will find a series of utilities for inserting initial data and importing taxonomy terms and their translations and/or law records.

The previous Ansible scripts provisions the box with a basic wordpress installation which will be listening to port 80. In order to finish configuring it point your browser to the URL specified on the configuration files and follow the instructions there.
There are several possibilities to access the files system on the VM in order to modify code files such as copying files over with SCP command or creating a NFS mount point on the VM.
Sometimes it can happen that the during the “Update packages list” step of the common Ansible playbook, the following error is thrown, stoping the execution of the provisioning.

In order to solve this, a failsafe sources list can be selected. For that, it is just necessary to change the following line in the deployment/ansible/roles/common-ubuntu/tasks/main.yml file:
- name: add new sources.list that checks for mirror
  copy: src=sources.list dest=/etc/apt/sources.list owner=root group=root mode=0644
  sudo: yes
And replace src=sources.list with one of the available failsafe sources lists in deployment/ansible/roles/common/tasks/main.yml
If the machine is provisioned and started but CKAN and/or Tomcat are not accesible through their respective URLs, it can be that supervisor has not being able to start them for some reason. In order to manually start them:
. ~/.virtualenvs/ckan/bin/activate
supervisorctl
